This Chocolate Biscuit Cake Recipe (No Bake Recipe) is a beautiful, easy-to-make European dessert, the perfect treat for the entire family.
It looks great as a cake for a fancier occasion, but it is equally delicious if shaped like a "salami" log, the traditional way of making it. It was also Her Royal Majesty the Queen’s favorite afternoon tea cake.

This is a recipe from my collection of Cakes and Entremets where you can find a variety of recipes like this Easy Decadent Chocolate Tart, a No Bake Orange Mousse Cake, Fruit Buckle Cake or this Philadelphia No Bake Cheesecake.
Jump to:
What is a Chocolate Biscuit Cake
Chocolate Biscuit Cake is a classic dessert recipe and a popular one in many countries from Eastern and Central Europe.
It is made with sweet cookies (biscuit pieces), like Maria cookies or graham crackers, as a base of the recipe, dried or candied fruit, chopped small pieces of nuts, and a chocolate mixture cooked on the stove, made with cocoa powder, sugar, butter, and flavors.
The recipe is presented in many European cookbooks as an easy dessert shaped like a log resembling a dried salami.
In fact, it is just a simple no-bake roll with biscuits (sweet crackers) and chocolate, and it is one of the favorite desserts among children.
Nobody knows the original recipe for this dessert. Each country has its own version, and ingredients may vary slightly from place to place, but the basic concept of a biscuit-based dessert with chocolate and cream remains the same.
You can find it under different names like Chocolate Fridge Cake, Chocolate Biscuit Refrigerator Cake, Chocolate Tiffin Cake, or Chocolate Hedgehog Slice.
The popularity of this type of dessert is likely due to its simple and delicious flavor, as well as its versatility and ease of preparation.
Also, I just learned that in Malaysia, they make a similar cake called "Batik Cake," which they serve on special occasions.

Queen Elizabeth's Favorite Cake
It is widely known that the Queen of England, Queen Elizabeth II, had a fondness for Chocolate Biscuit Cake. It is said to be one of the queen's favorite cakes and was frequently served at royal events and state functions.
The recipe for the cake is believed to have been passed down through the royal family for generations, and it is considered a classic and traditional British dessert. Can you imagine being a royal chef at Buckingham Palace or Windsor Castle? Lots of pressure, I would think...
Also, a fun fact is that at the wedding of Prince William to Catherine Middleton, this Chocolate Biscuit Cake was specially made for William as the groom's cake.
The recipe is so loved that Prince William is known to enjoy the cake occasionally.
How cool is that? You learn something new every day!
While I usually shape this dessert as a log because this is how I was always used to do it, this time, I decided to shape the mixture into a cake. I needed an easy, no-bake dessert that looked fancier.
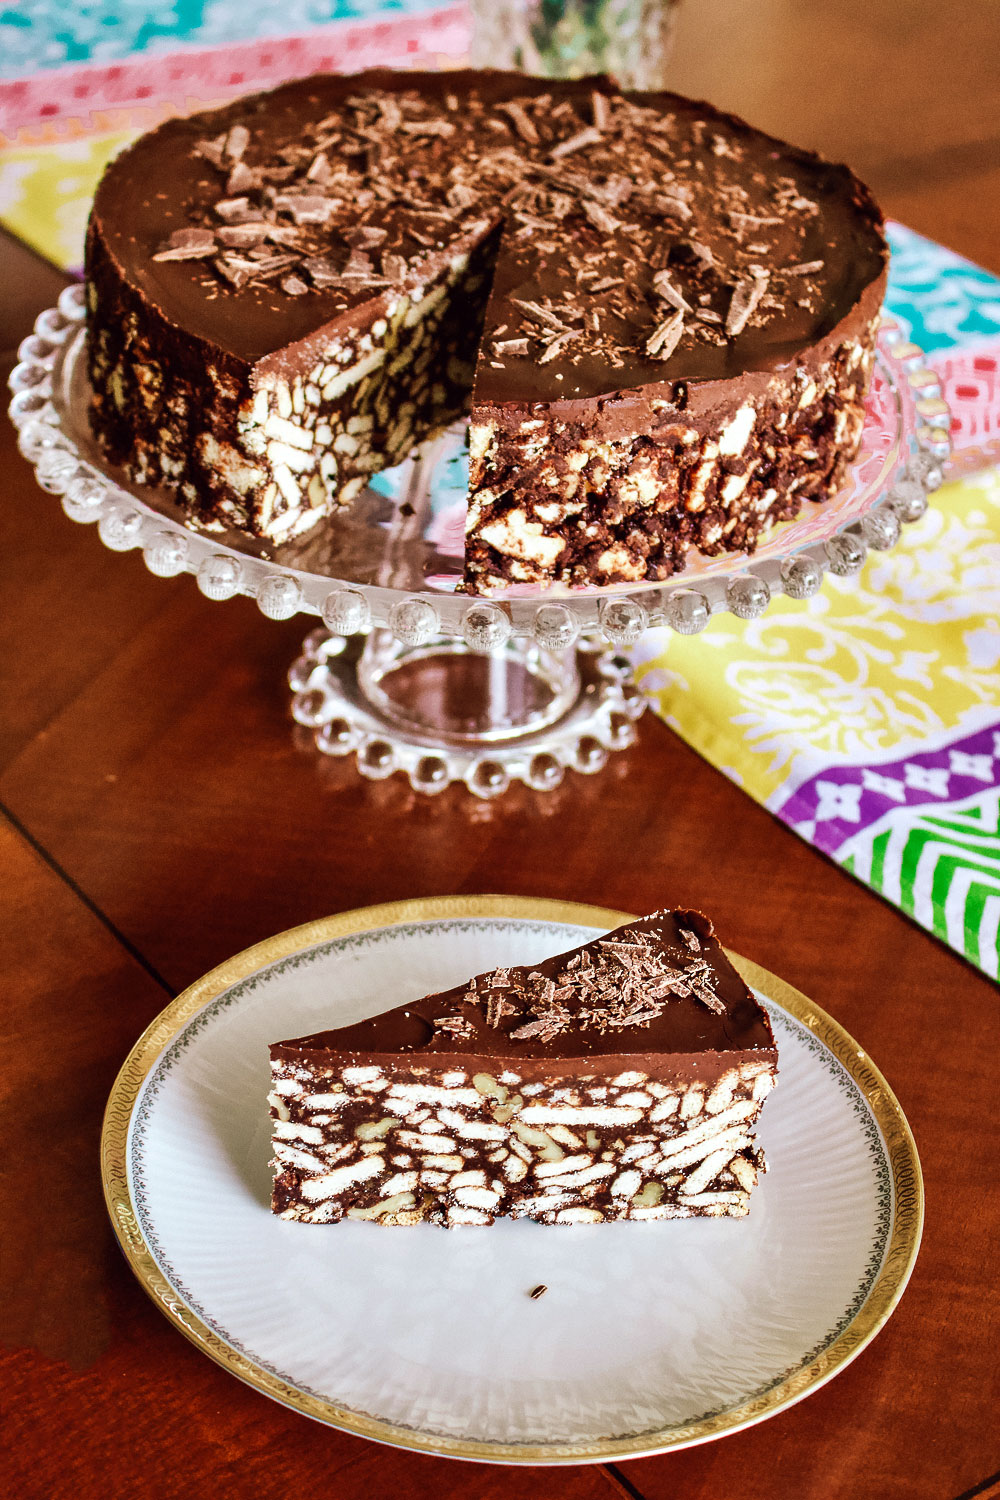
As you can see in the picture below, it really resembles a "salami" inside. The biscuits, the nuts, and the dried fruit have different textures that make this dessert truly unique.

Ingredients
This recipe uses simple ingredients that most people should have in their pantries.
The cake:
Cookies: The No-Bake Chocolate Biscuit Cake uses digestive biscuits, which are very popular overseas. If you cannot find them, you can use regular graham crackers or Marias cookies found in any grocery store.
Some people use crushed biscotti or animal crackers, or simple sugar cookies. I prefer digestive or Marias cookies because of their simple flavor and availability in stores.
There are different European brands that you can easily find in the stores or online.
No matter where you go in the world, you will find a variation of the Marias cookie. In Spain, they even serve it over pudding or natilla.
The bottom line is that you can use whatever sweet, simple cookie, biscuit, or cracker you like. This makes the recipe flexible and easy to put together using ingredients from the pantry.
Besides that, no baking is involved, which is fantastic if you are not that good of a baker. You just have to follow the recipe, and you should be safe.
Toasted walnuts: Replace them with pecans, almonds, or a mixture of your favorite nuts. We try to keep the recipe versatile and easy to make for anybody who likes a simple dessert.
Dried or candied fruits: These are optional, but highly recommend it. Raisins are easy to find, but you can also add cranberries for a festive look or a combination of candied fruits that you enjoy.
Chocolate syrup:
This chocolate syrup will bind the ingredients together.
- Granulated sugar
- Unsweetened cocoa powder- Please use only cocoa powder without added ingredients.
- Cold water
- Unsalted butter at room temperature
- Vanilla extract - Try to find the best version of vanilla you can afford.
- Rum extract- If you don't have it, you can replace it with real rum, but remember that you cannot serve it to children. I would encourage you to try the rum extract for the flavor. It works very well in the recipe, and the entire family can enjoy it.

Chocolate Ganache:
The chocolate ganache is what we use to cover this delicious cake.
- Heavy cream: Heavy cream, also known as heavy whipping cream, is a high-fat dairy product that is commonly used in cooking and baking. Heavy cream typically contains at least 36% milk fat and can be whipped to make whipped cream or used to make chocolate ganache.
- Semi-sweet chocolate: Use the best chocolate you can afford with at least 50% cacao solids. I would stay away from chocolate chips, as they are formulated to hold their shape in baked goods. Therefore, they are not melting properly. You want a chocolate brand that melts nicely. Chopped chocolate melts better than larger chunks.
- Shaved chocolate for decor- this could be any chocolate you like: Milk chocolate, dark chocolate, semi-sweet chocolate, or a mixture of them.
How to make the cake
Step 1. Start with the chocolate syrup.
Place sugar, cocoa powder, water, and butter in a small pot. Place the pot on the stove on medium heat and bring the mixture to a boil. Simmer the syrup for about 7 minutes, mixing constantly. Remove from the stove and let the mixture cool for 10 minutes.
Step 2. Toast the nuts
You can toast nuts on the stove, in a skillet, or inside the oven.
On The Stove:
I do it on the stove if I have a small amount of nuts I want to toast. The time to toast nuts on the stove is always shorter than the time the nuts require in the oven.
Place a medium skillet on medium heat. Heat walnuts until browned and fragrant, constantly stirring so they don't burn. In about 2-5 minutes, they should be done. Please watch the nuts because they tend to burn fast if unattended.
Remove them from the pan, chop them, and use them for the recipe.
In The Oven:
Preheat oven to 350F/180C.
Line a baking sheet with parchment paper and place the nuts in a single layer. You can also use aluminum foil.
Toast until fragrant and slightly browned for about 7 minutes. Remove from the oven and allow them to cool. Use them in the recipe as needed.
Step 3. Assemble The Cake:
Add the toasted chopped walnuts, the rum flavor, the vanilla, and the dried/candied fruits to the syrup. Set aside.
Meanwhile, break the graham crackers or other cookies you might use into small pieces and place them in a large bowl.
Pour the chocolate mixture over the crackers and mix all until the cookies are coated.
Place the mixture into a springform pan and press it down to become compact.
Refrigerate for an hour.
Step 4. Make the chocolate ganache:
Heat the heavy cream on the stove, using a small saucepan, until it comes closer to the boiling point. As soon as the cream simmers, remove it from the stove and add the chocolate.
(The recipe card at the bottom of this article will tell you how much chocolate and cream to use).
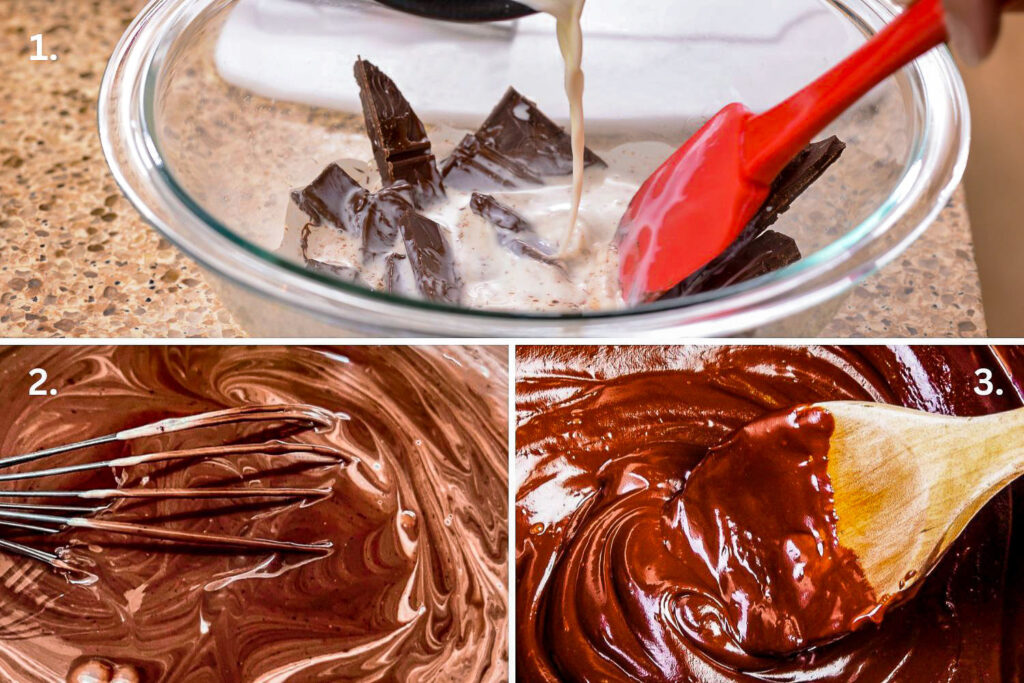
Stir the cream and chocolate together until you obtain a smooth, creamy chocolate ganache. This chocolate mixture will then go on top of the cake.
Bonus: Try No Bake Cheesecake with Berries
My version of this recipe is flavored with rum. If you don't like that flavor, use vanilla, almond flavor, or anything else you want.

Expert Tips
- Do not add more liquid if the mixture looks a little dry after mixing the biscuits/crackers/Maria cookies with the chocolate syrup.
- The ratio between dry and wet ingredients is perfect for getting the right consistency after the cake sits in the refrigerator for a few hours.
- The biscuits will have time to absorb the flavors and become soft. For me, the perfect pan was a springform pan because I found it easier to remove the cake before serving.

How to serve this cake
A small slice of this cake on a serving plate is more than enough for anyone, as it is rich, delicious, and perfect with a cup of coffee or tea.
This cake also travels well, which makes it perfect to pack for lunch or a later pick-me-up dessert in the afternoon at work.
Kids absolutely love this deliciously simple cake, and the recipe is great to make when there is no inspiration on what dessert to make for the weekend or to take with them to school.
Leftovers
Leftovers should be stored in the refrigerator. The cake lasts for about a week if you keep it cool, wrapped in foil, or in an airtight container.
Recipe Faqs
You could use a regular cake pan lined with plastic wrap or parchment paper for easy removal. If you do not want to make this dessert into a cake, the traditional way is to shape the mixture into a cylinder, like a salami, using plastic wrap.
Yes, definitely. It freezes beautifully for up to three months. You can wrap the entire cake in foil or just individual slices for easy access. After wrapping, place the cake or the slices in freezer bags.
Absolutely! To make a gluten-free version, simply substitute the digestive biscuits or graham crackers with gluten-free cookies or crackers that you enjoy.
Ensure that all other ingredients used, such as the cocoa powder, chocolate, and flavors, are also gluten-free. Follow the same recipe instructions and enjoy a delicious gluten-free chocolate biscuit cake.
If you enjoy the combination of chocolate and coffee, you can definitely do this. Simply dissolve a teaspoon of instant coffee granules or espresso powder in the chocolate syrup mixture while it simmers on the stove.
The coffee flavor will infuse into the syrup and enhance the overall taste of the cake. You can adjust the amount of coffee to your preference for a subtle or stronger coffee flavor. Proceed with the recipe as usual, and you'll have a delightful chocolate and coffee-infused biscuit cake.
For the love of chocolate biscuit cake, people! Just writing this article, and I want to go and grab another slice of it! 🙂
More recipes to enjoy
Low Sugar Bread With Dried Fruit And Nuts
Easy Dark Chocolate Walnut Cookies
Chocolate Cake With Tart Cherries
More No-Bake Recipes
Enjoy!
📖 Recipe

The Queen's Chocolate Biscuit Cake
Ingredients
The base of the cake:
- 22 ounces digestive biscuits/Maria cookies/graham crackers/tea biscuit
- 1 cup toasted walnuts
- ½ cup dried or candied fruit
Chocolate Syrup:
- 1 cup granulated sugar
- ½ cup unsweetened cocoa powder
- 1 cup cold water
- ⅔ cup unsalted butter at room temperature
- 1 teaspoon vanilla extract
- 1 teaspoon rum flavor
Chocolate Ganache:
- ½ cup heavy cream
- 4 ounces semi-sweet chocolate
- 1 ounce shaved chocolate for decor
Instructions
Make the chocolate syrup:
- In a small pot, combine sugar, cocoa powder, water, and butter.
- Place the pot on the stove over medium heat.
- Bring the mixture to a boil, ensuring all the ingredients are well incorporated. Stir continuously during this process.
- Once the mixture reaches a boil, reduce the heat to a simmer.
- Allow the syrup to simmer for approximately 7 minutes, ensuring you continue to stir constantly.
- After the simmering time, remove the pot from the stove. Let the syrup cool for about 10 minutes.
Toast the walnuts:
- Add the walnuts to a skillet and toast over medium heat until browned and fragrant. (for about 2 to 5 minutes). Remove from heat and allow them to cool. Chop them.
Assemble The Cake:
- Add the toasted chopped walnuts, the rum flavor, the vanilla, and the dried/candied fruits to the syrup. Set aside.
- Meanwhile, break the graham crackers into small pieces and place them in a large bowl.
- Pour the chocolate mixture over the crackers and mix all until the crackers are coated.
- Place the mixture into a springform pan and press it down to become compact.
- Refrigerate for an hour.
Chocolate Ganache:
- In a small pot, bring the heavy cream to a boil, remove it from the stove and add the chopped chocolate.
- Mix the combination until the chocolate is completely melted and mixed with the heavy cream.
- Pour the chocolate ganache over the cake and spread it with a spatula.
- Refrigerate for 3-4 hours or overnight.
- Remove the springform and place the cake on a platter.
- Decorate with shaved chocolate.
- Cut and serve.
- Keep it in the refrigerator.




LauraOinAK says
I think my boys need to help make this one. It would be a win for everyone. Well, maybe not my waistline...
The Bossy Kitchen says
🙂 Desserts are never helpful for the waistline, but they can bring joy in our life. I hope your boys will enjoy this dessert as much as I enjoyed it when I was a child.
Tina says
What can you use instead of fruit? I'm not much on fruit and chocolate together?
The Bossy Kitchen says
Hi, skip the fruits and put more nuts if you like them, otherwise just skip the fruit completely.
Fidaa Lahoud says
when do I add the fruit and walnut mixture to the cake?
The Bossy Kitchen says
Hi, You have the instructions on the bottom of the article in the recipe card. It will tell you exactly what to do.
Cheryl Itallo says
Will try this one
The Bossy Kitchen says
Awesome, enjoy!
Elizabeth L says
Looks amazing! Do you line the springform pan with parchment ?? Or oil it at all?
The Bossy Kitchen says
You don’t need to oil or line the springform with anything. The dessert will set beautifully without sticking to the pan.
Catherine Tideswell says
I used these ingredients and placed in a greased large egg shaped tin. Took out a couple of hours later, then decorated with chocolate spread and iced flowers. Saved me lots of work this Easter and tasty too. I usually use BBC good food recipes but this was just as good.
Shirley says
If I don’t have a springform are there any subs? Also, should the shaved chocolate be milk, semi sweet or bitter sweet?
The Bossy Kitchen says
Hi Shirley,
You could use a regular cake pan that has been lined with plastic wrap or parchment paper for easy removal. If you do not want to make this dessert into a cake, the traditional way is to shape the mixture into a cylinder, like a salami, using plastic wrap. The choice of shaved chocolate is yours, and there are no rules for that. Use whatever you like. I personally used semi-sweet chocolate, but this is what I have in the house for baking.
Mehjabeen says
Hi this dessert looks delicious on its own that i feel u dont need that topping or do you
The Bossy Kitchen says
Hi, The topping makes it more decadent, but you are right. You do not need to add it if you don't want it. The dessert is indeed delicious on its own.
Donna says
Can you take this cake to a party, how long can it be out of the refrigerator for ?
The Bossy Kitchen says
Yes, you can. The cake could be at room temperature for 2-3 hours, no problems. However, it would be a good idea to keep it out of the sun or in a very hot environment.
kathleen says
Can I freeze this cake and for how long?
The Bossy Kitchen says
Yes, you can freeze it for up to three months.
Ingrid says
If I don’t use nuts (can’t eat nuts or seeds)do I have to replace them with additional cookies
The Bossy Kitchen says
No, as you will unbalance the ratio between dry and wet ingredients. Just skip the nuts. We add them for texture and taste, but the cake will be fine without them.
Miha says
Gustos, simplu și nepretențios acest salam de biscuiți din copilărie. Modernizat