This cake features layers of praline, chocolate mousse, vanilla cream, and Dacquoise, all covered with a decadent mirror chocolate glaze. One of the best cakes you will ever have, this delicious little entremet is silky and perfect for a special celebration in your family. The secret to success is to use quality ingredients.
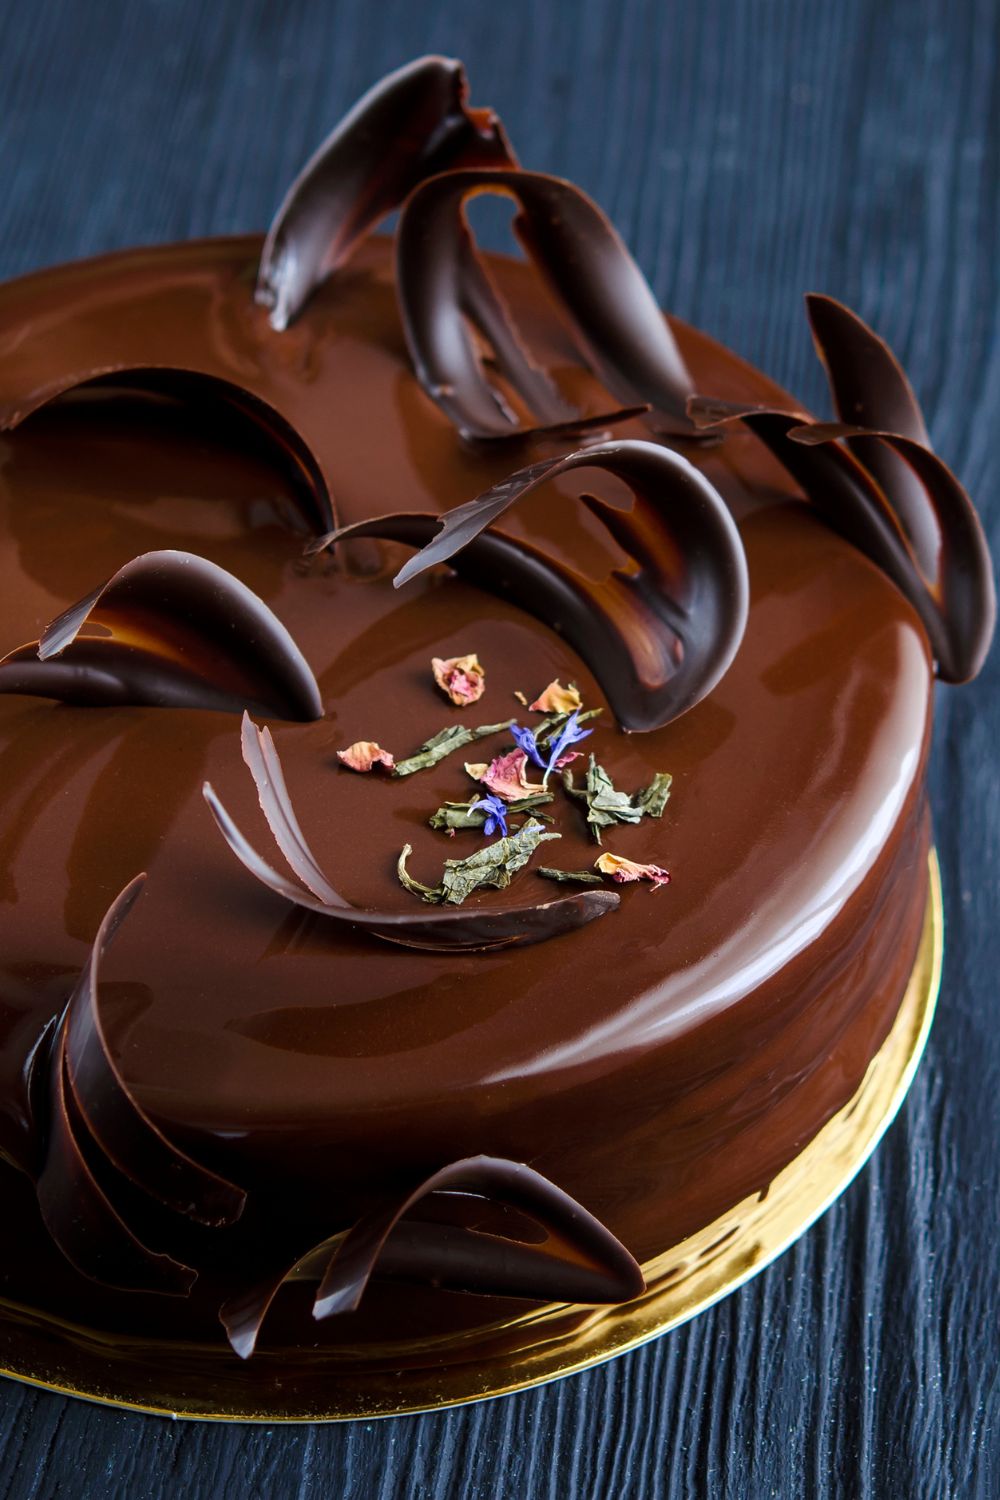
Last week, we celebrated my husband's birthday, so I attempted to make him an entremet. For those who do not know what an entremet is, Wikipedia explains it: "An entremet is a multi-layered mousse-based cake with various complementary flavors and varying textural contrasts." Yes, sounds fancy and very European, but it is also very delicious.
My husband wanted a chocolate cake, but if you know me, I cannot go with just a cake and some buttercream. I had to create something that would be hard to forget.
Jump to:
What Are The Layers In This Cake
- A praline base: This praline is made with caramelized sugar, hazelnuts, and almonds. It is also called French praline.
- Dacquoise cake insertions:
- Vanilla Cream
- Chocolate mousse
- Mirror glaze
The recipe has multiple steps that require time and patience. The layers are easy to make, but they do need some time in the fridge or the freezer to set. The mirror glaze is poured relatively warm on the cake. Therefore, these types of cake entremets must be frozen solid before we glaze them.
However, the mirror glaze cake is served at room temperature.
Ingredients Needed
This is your shopping list for easy reference:
- Granulated sugar
- Whole almonds
- Whole hazelnuts
- Unsalted butter
- Dark chocolate
- Large Eggs
- Almond meal flour
- Powdered sugar
- Heavy whipping cream
- Vanilla extract
- Corn syrup (Karo brand works. Look for the light version of it)
- Gelatin sheets or unflavored gelatin powder- 1 box of Knox original unflavored gelatine or seven gelatin sheets.
- Honey
- Unsweetened cocoa powder
Utensils Needed
- A food processor
- Spatulas
- Mixing Bowls
- Saucepans
- Baking tray with a silicone mat or parchment paper
- Two springforms cake pans of 8 inches and 6 inches each
- Candy thermometer or a digital thermometer
- Hand mixer or a stand mixer like Kitchenaid
How to make
Before you start working on the cake, please read the step by step instructions a few times so you understand how to build each layer properly.
Step 1. Prepare the praline:
a. Cover the bottom of a cookie tray with parchment paper or a silicon mat. Set aside.
b. Roast the nuts first and allow them to cool before you use them further.
c. Caramelize the sugar and add the nuts. When the sugar reaches a temperature of 320F/160C (please use a thermometer), remove it from the heat and pour it on the prepared tray. Let it cool.
It will look something like this:

d. Break the praline into multiple pieces and make three separate piles. Grind each pile of praline in a food processor until you obtain an oily paste, like nut butter.
Note: It's best to divide the mixture into three parts and grind them each for 5 minutes at a time to avoid overworking your food processor.
Step 2. The Base Of The Cake:
a. Place the butter and the chocolate in a saucepan and melt them together.
b. Stir in the praline (see step 1) already made and let cool until the temperature drops to 73.4 F/23 C.
c. Cover the bottom of an 8-inch/20cm diameter springform pan with parchment paper and fill the bottom with the praline mixture. Place the pan inside the freezer.
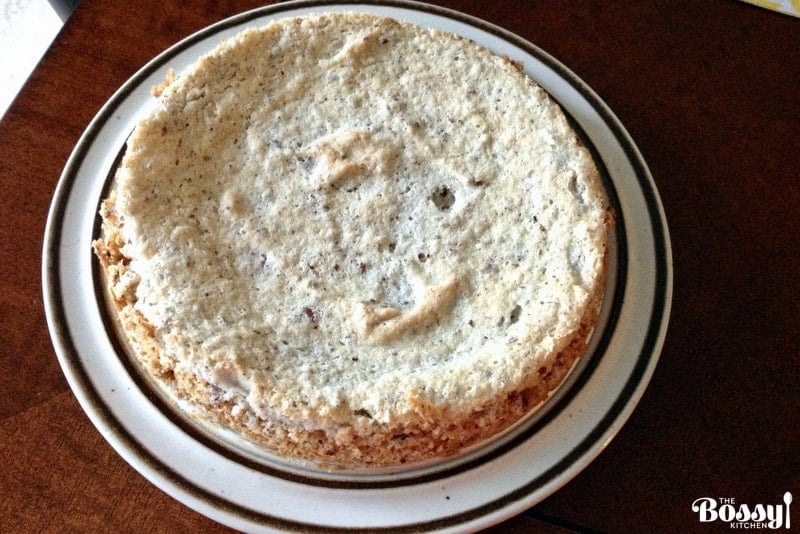
Step 3. Make the Dacquoise cake layer:
a. In a large bowl, beat the egg whites with the granulated sugar.
b. Stir in the ground almonds and powdered sugar while lifting the mixture gently to incorporate the nuts without losing the air in the egg whites.
c. Cover the bottom of a 6-inch/15 cm springform cake pan with parchment paper. Place the egg whites and nuts inside the pan using a spatula, ensuring the mixture is spread evenly.
d. Bake 10 to 12 minutes at 170C/340F. Remove the parchment paper with the cake layer on it and place it on a cooling rack.
Step 4. Make the vanilla cream layer:
This cream has a bit of gelatin because it has to be quite stiff, as we will use it as the center of the cake over the Dacquoise cake layer.
a. Soften the gelatin in a bowl of cold water.
b. Boil the cream, vanilla bean/ vanilla extract, and sugar.
c. Mix the egg yolks with the cream and cook up to 185 F/85C. Use a thermometer.
d. Squeeze the gelatin to remove the water and stir in the mixture.
e. Cool in a water bath with ice.
f. Pour the mixture into the 6-inch/15cm springform cake pan (the one you used previously to bake the Dacquoise cake layer) and freeze it(better overnight).
Step 5. Make the chocolate mousse layer:
We will use heavy cream in two ways for this step. First, we will whip part of the cream and the rest will bring it to a boil, then mix it with the chocolate.
a. Make the whipped cream:
Use a very cold bowl and very cold heavy whipping cream. Whisk on medium speed until you obtain soft peaks. They are ideal for this chocolate mousse. Set it aside and work on the next step.
b. Mix the sugar and egg yolks in a small bowl.
c. In a saucepan, heat the heavy cream to the boiling point and set it aside.
d. In a large bowl, melt the chocolate until it reaches 113F/45C. Add the heated heavy cream and the egg yolk mixture and mix everything to create an emulsion.
e. Fold the whipped cream into the chocolate mixture and set aside. This is your chocolate mousse.
Step 6. To assemble the cake:
a. Remove the Praline bottom from the freezer, which should be sitting in the 8-inch springform cake pan. Keep it in the same springform cake pan.
b. Add ⅓ of your chocolate mousse and spread it over the bottom.
c. Place the Dacquoise insertion cake in the middle of the springform.
d. Bring the vanilla cream from the freezer, which should be in the 6-inch springform cake pan, and place it over the cake insertion.
e. Come with more chocolate mousse and cover the cake with it. Smooth the surface of the cake with a spatula, and place it in the freezer.
Step 7. Mirror Glaze:
To get the best results, you will need to work with a frozen cake. The mirror glaze is usually poured over the cake in a warm form, so it is essential to have a frozen surface to work with. My cake stayed in the freezer overnight, so it was in perfect shape for this step.
The base of every mirror glaze recipe is the gelatine, so start with that.
a. Soften the gelatin in a bowl with cold water.
b. Bring the heavy cream to a boil with the corn syrup and honey. Remove from the heat and set aside.
c. Meanwhile, on medium-high heat, bring the water and sugar to 250F/121C to make a syrup. (use a thermometer)
d. Once the syrup is cooked, pour the cream mixture over it.
e. Add the cocoa powder and boil together for 3 minutes. Cool it down to 70C/160F.
f. When the mixture reaches the right temperature, add the gelatin drained of water and incorporate it.
Critical step:
Use a spatula and start mixing only in the middle of the mixture, at the bottom of the pot. If you make circular movements with a whisk or anything else, you will add air bubbles to the mix, so the glaze will not be shiny and smooth anymore but grainy and bubbly.
Cool the glaze until it reaches 90F/32C.
Step 8. Glaze the cake:
a. Place the frozen solid cake on a wire rack sitting on a rimmed baking sheet and pour the glaze over the cake to cover it completely.
b. Begin pouring the chocolate glaze onto the center of the cake in a circular motion, then slowly work your way out to the edges to also cover the sides of the cake. Let the glaze drip for about 10 minutes, then use a spatula to scrape away any drips from the cake board. The glaze should be almost set.
c. Place the cake in the fridge for at least 30 minutes to allow the glaze to set fully. Decorate the cake as you like using small pieces of chocolate, sugar paste, or fresh fruit.
How to serve this Mirror Glaze cake
Cut slices of this cake using a long knife immersed in a bowl with hot water. This way, the slices will be clean and the layers nicely visible. The cake is decadent and rich, so thinner pieces are appropriate.
Leftovers
Keep the leftovers in the fridge for up to three days in an airtight container. I honestly don't think the cake will last three days as everyone will want another slice of it. You can also freeze it for up to six months, covered in cling wrap and inside a freezer bag.
Keep the leftovers in the fridge for up to three days in an airtight container. I honestly don't think the cake will last three days as everyone will want another slice of it.
You can also freeze it for up to six months, covered in cling wrap and inside a freezer bag.
What can you do with the leftover mirror glaze?
You can freeze it and reuse it for another cake. Warm it up on the stove or microwave and bring it back to 90F/32C to glaze the cake. The glaze is warm and thin enough to cover nicely another smaller cake.

Shiny cakes are very attractive and perfect for birthday celebrations and other special events. My chocolate mirror cake is hopefully easy enough to make it on your short list of cakes for the next birthday in your family.
More recipes to love
- Festive Cakes and Tortes For The Holidays
- Cream cheese lemon coconut cake
- White Chocolate Hazelnuts Dacquoise Cake
- Walnut Meringue Cake With Chocolate Mousse
- No Bake Cheesecake with Berries
Happy baking!
📖 Recipe
Chocolate Mousse Praline Entremet (With Mirror Glaze)
Equipment
Ingredients
French Praline:
- 1 ¼ cups granulated sugar
- 1 cup whole almonds
- 1 cup whole hazelnuts
Praline bottom:
- 1 tablespoon unsalted butter
- ¼ cup dark chocolate 70% dark
Dacquoise cake layer:
- 2 egg whites
- ¼ cup granulated sugar
- ½ cup ground almonds
- ⅓ cup powdered sugar
Vanilla Cream:
- ¾ cup heavy cream
- 1 vanilla pod or 1 teaspoon vanilla extract
- 2 ½ tablespoons granulated sugar
- 2 egg yolks
- ½ teaspoon gelatin powder OR one gelatin sheet 1 sheet approximately 2 grams
Chocolate Mousse:
- ¼ cup granulated sugar
- 3 egg yolks
- 1 cup heavy cream
- 12 ounces dark chocolate
- 3 cups whipped cream measure heavy cream and beat it with a mixer until whipped cream
Mirror Glaze:
- 1 ½ teaspoons gelatin powder or 6 sheets of gelatin (2 g each)
- 1 cup heavy cream
- ¼ cup corn syrup
- 1 ½ tablespoons honey
- ½ cup water
- 1 ½ cups granulated sugar
- ¾ cups cocoa powder
Instructions
Make the praline:
- In a non-stick pan, toast the hazelnuts and almonds to bring out the flavor. You could also place them into a 400F/200° C oven for 15 minutes.
- Place the sugar into another non-stick pan; heat gently over medium heat without stirring.
- When the sugar begins to dissolve, add the almonds and hazelnuts. Mix well with a spatula and cook until the sugar is completely dissolved and the mixture forms a light caramel (320 F/160° C). This process should be carried out over medium heat; otherwise, the caramel will become too dark.
- Pour the mixture onto a lightly oiled marble slab or an oiled baking sheet and let cool for 1 hour.
- Break the mixture into pieces and split it into three piles. Grind each pile finely in a food processor. Continue processing until it forms an oily paste. (It's best to divide the mixture into three parts and grind them for 5 minutes at a time to avoid overworking your food processor.)
Praline bottom:
- Place the softened butter and the chocolate in a saucepan and melt them together.
- Stir in the praline paste and let it cool until the temperature drops to 73.4F/23 ° C.
- Use an 8-inch/18 cm springform pan. Cover the bottom with parchment paper and fill it with the praline mixture. Place the pan in the freezer and allow it to freeze for a few hours or overnight.
- The Dacquoise cake layer:
- Beat the egg whites with the granulated sugar to a stiff peak.
- Stir in the ground almonds and powdered sugar while lifting the mixture gently to incorporate the nuts without losing the air in the egg whites.
- Cover the bottom of a 6-inch/16 cm springform cake pan with parchment paper. Using a spatula, place the mixture of egg whites and nuts inside the pan, making sure that the mixture is spreaded evenly.
- Bake 10 to 12 minutes at 170C/340F.
- Remove the parchment paper with the cake layer on it and place it on a rack to cool.
Vanilla Cream:
- Soften the gelatin in a bowl of cold water.
- Boil the cream, vanilla bean/ vanilla extract, and sugar.
- Mix the egg yolks with the cream and cook up to 185 F/85C. Use a thermometer.
- Squeeze the gelatin to remove the water and stir in the mixture.
- Cool in a water bath with ice.
- Pour the mixture into the 6-inch/15cm springform cake pan (that you used previously to bake the Dacquoise cake layer) and freeze it(better overnight).
Chocolate mousse:
- Make whipped cream. Use a very cold bowl and very cold heavy whipping cream. Whisk on medium speed until you obtain soft peaks. Set it aside and work on the next step.
- In a small bowl, mix the sugar with the egg yolks. Set aside.
- In a large bowl placed on water bath, melt the chocolate at 45C/113F(use a thermometer). Set aside.
- Heat the cream to the boiling point and remove it from the stove. Set aside.
- Add the warm cream and egg yolk mixture to the chocolate and mix to create an emulsion.
- Fold the whipped cream into the chocolate mixture and set aside.
How to assemble the cake and decorate it:
- Remove the 8-inch diameter springform cake pan from the freezer where you have the praline base.
- Pour ⅓ of the chocolate mousse over the praline bottom, then place the Dacquoise cake layer in the middle of the circle.
- Add the frozen vanilla cream over the cake layer.
- Finish with the remaining mousse. Make sure the mousse is smooth on the surface. Use a spatula for this step. Place the cake pan in the freezer.
- After a few hours, when it is solidly frozen, remove it from the springform and place it over a rack with a baking sheet underneath.
Mirror Glaze:
- Soften the gelatin in a bowl with cold water.
- Bring the heavy cream to a boil, together with the corn syrup and the honey. Remove from the heat and set aside.
- Meanwhile, on medium-high heat, bring the water and sugar to 250F/121C to make a syrup.(use a thermometer)
- Once the syrup is cooked, pour the cream mixture over it.
- Add the cocoa powder and boil together for 3 minutes. Cool it down to 70C/160F.
- When the mixture reaches the right temperature, add the gelatin drained of water and incorporate it.
- Critical step:Use a spatula and start mixing only in the middle of the mixture, at the bottom of the pot. If you make circular movements with a whisk or anything else, you will add air to the mix, so the glaze will not be shiny and smooth anymore but grainy and with bubbles in it.
- Cool the glaze until it reaches 90F/32C.
- Begin pouring the chocolate glaze onto the center of the cake, then slowly work your way out to the edges. Let the glaze continue to drip for about 10 minutes, then use a spatula to scrape away any drips from the cake board.The glaze should be almost set. Place the cake in the fridge for at least 30 minutes to allow the glaze to set fully.
- Decorate as you like. Here are some ideas: Small pieces of chocolate or chocolate shavings/sprinkles, fresh strawberries, or sugar paste decorations are a nice touch.
- This cake requires refrigeration and is good for up to three days. It can also be frozen for up to six months. Wrap it in foil and place it inside a freezer bag. Thaw it in the fridge for a few hours.

Sunny says
Made this for my boyfriend's birthday. Changed the mirror glaze to a black chocolate ganache because I prefer the taste and had been cooking all day. Topped with whiskey honey mouse inside heart shaped cups. Delicious!
The Bossy Kitchen says
I would love to see a picture of your cake! It sounds like you did a wonderful job with the recipe! Thank you for visiting!