This Walnut Meringue Cake With Chocolate Mousse is a decadent, elegant, and delicious cake that will win your heart forever.
This cake is part of the entremet cakes category, one of the best cakes I have ever had. The layers of meringue and chocolate mousse are easy to make, and the results are fabulous!

Jump to:
Best Dark Chocolate Mousse Cake
You need to try this recipe at least once in your lifetime. Decadent, delicious, and elegant, this cake is truly part of the "best cake with chocolate mousse category."
The cake is not difficult to make, but it does require some time. All entremets are usually made by freezing parts or all layers during the process. Basically, this is what takes most of the time, as the rest is pretty easy to make if you follow the instructions.
Cake Layers
- The Base of the cake. The base of the cake is a 9-inch(23 cm) walnut meringue cake layer. This layer can also be called dacquoise.
- Dark Chocolate mousse. The next layer is dark chocolate mousse.
- Walnut Meringue Layer. On top of the mousse, a 7-inch layer of walnut meringue cake will sit in the middle of the cake, like an insertion.
- The Filling. The rest of the dark chocolate mousse is poured over.
- Cocoa Mirror Glaze. When ready to decorate, the cake is removed from the freezer and covered with a cocoa mirror glaze.
Tools Needed
- A 9x3 inch cake ring to build the cake, but if you don't have one, a 9-inch springform will also be OK. (23 cm diameter)
- A kitchen scale: This is a professional cake that requires precise measurements. I know that the average American would not even look at this recipe because it is not in cups and teaspoons, but if you really want to make this awesome cake, a small investment in a scale would not kill you.
- A Kitchen thermometer: Very important for measuring the temperature of the chocolate glaze.
How to make this cake
The secret to this delicious Walnut Meringue Chocolate Mousse Cake is in the meringue layers. Bake the meringue layers low and slow. Too high, and you'll get a burn. Too low, and it won't set. The result must be a thick, crunchy layer that adds texture to the cake.
Here's a tip: bake these layers the night before. Letting them cool slowly in the oven overnight dries them out perfectly.
Step 1: Meringue Layers
- Heat your oven to 212F/100C.
- Grab a baking tray and line it with parchment paper.
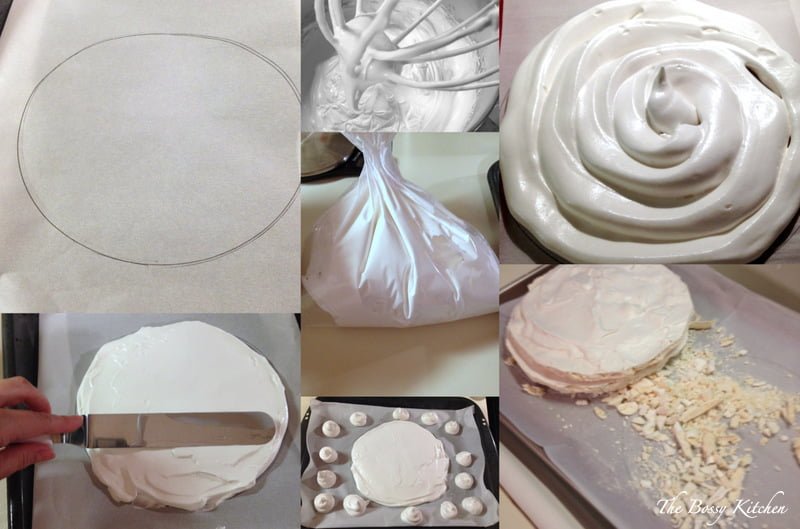
- Sketch out a 9-inch and a 7-inch circle on the paper using a pencil. If you do not have enough space, use two baking sheets.
Egg Separation and Beating:
- Separate your eggs. With the whites in a large bowl, beat them until you see soft peaks forming.
- Gradually add sugar, one tablespoon at a time, then the vanilla.
- Beat until you've got stiff, glossy peaks.
Folding and Piping:
- Gently fold ground walnuts into the mix.
- Scoop the meringue into a sealable bag, snip a corner to create an opening, and pipe spirals inside your drawn circles.
- Smooth the meringue's surface with a spatula, then use any extra to make small cookies.
Bake at 212F/100C for 90 minutes, then turn off the oven and let everything sit overnight.
And there you have it, the trickiest part of this cake, simplified. Wasn't that a breeze?
Step 2. Make The Chocolate Mousse. The chocolate mousse is easy to make, so please follow the instructions at the bottom of this post.
Step 3. Make The Mirror Glaze. The recipe card also includes instructions for the final layer of the cake, which will give it its beautiful shine.
Expert Tip
These types of cakes are usually glazed and finished while still frozen unless the recipe says something different.
A few tips about the mirror glaze
This is a glaze that used to be made only in professional kitchens, but in the last few years, people started to make it at home as well, and it suddenly became a trend. Do not be afraid to make it, but make sure you read the instructions and follow them step by step.
Make sure you cool down the glaze to the right temperature(read the recipe card).
You cannot pour warm glaze over a frozen cake. If the glaze is too cold, it will harden right away because of the gelatin. If it is too warm, it will melt the surface of the cake, causing a mess.

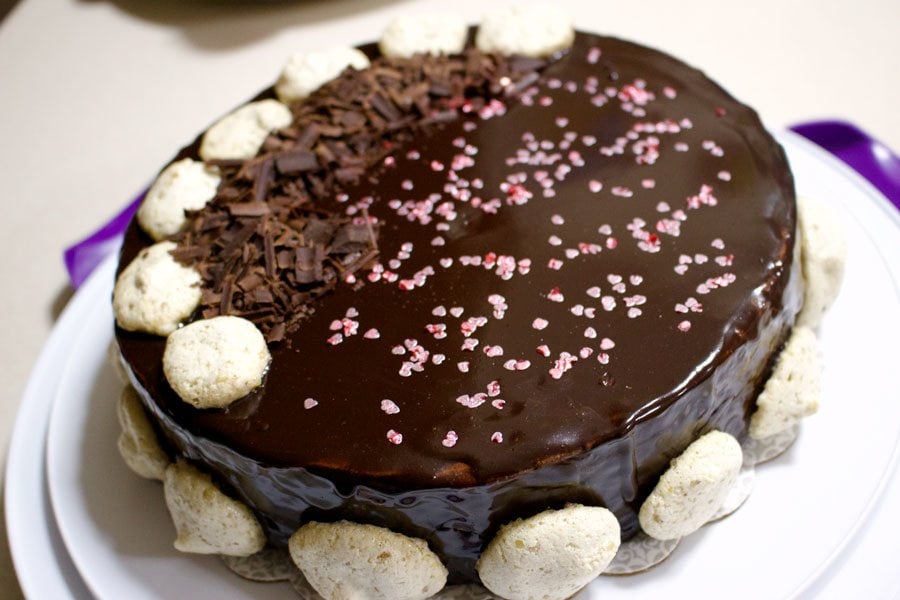
Here is the exact cake I made on a different occasion.
Here is a section of the cake:

How to Store This Cake
- Refrigeration: Once assembled, the cake should be refrigerated in an airtight container for up to 4-5 days.
- Freezing Tips: Leftover cake can be frozen for up to 3 months. Wrap individual slices or the entire cake securely in plastic wrap, followed by aluminum foil, to protect against freezer burn.
- Thawing: Thaw frozen slices overnight in the refrigerator. I sometimes enjoy the cake right from the freezer and it is delicious.
What do you think? Are you going to try this recipe? It might become one of your favorite things to bake. It is a great way to impress, that's for sure. Plus, your walnut meringue chocolate mousse cake recipe will make you the star of the party!
More recipes to love
- Classic European Chocolate Ganache Meringue Cake Recipe
- Meringue Farmer Cheese Cake
- No Bake Orange Mousse Cake
- Chocolate Cake with Italian Meringue Buttercream

📖 Recipe

Walnut Meringue Chocolate Mousse Cake
Equipment
Ingredients
Walnut Meringue Cake Layers:
- 7 egg whites
- 2 ½ cups powdered sugar
- 1 vanilla bean or 2 teaspoons vanilla extract
- 1 ⅓ cups ground walnuts
Chocolate Mousse:
- 1 ¾ cups dark chocolate from 52% up, chopped
- 2 large eggs
- 3 egg yolks
- ¼ cups cold water
- ½ cups granulated sugar
- 2 cups heavy cream
Cocoa Glaze:
- ½ cup granulated sugar
- 7 tablespoons unsweetened cocoa powder
- ¼ cup heavy cream
- ½ cup cold water
- 2 ¼ teaspoons gelatin powder (Or 0.2 ounces gelatin sheets)
Instructions
Walnut Meringue Cake layers:
- Preheat oven to 212F/100C. Cover the bottom of a baking tray with parchment paper.
- Draw a 9-inch circle on the parchment paper and a 7-inch diameter one. If you do not have enough space, use 2 baking sheets.
- Separate eggs. In a large bowl, pour the egg whites and add the vanilla.
- Beat the egg whites with an electric mixer on medium-high speed until soft peaks form.
- Slowly add sugar, 1 tablespoon at a time, until all the sugar has been added.
- Continue beating until the whites are stiff and glossy. Fold in the ground walnuts into the eggs with a spatula.
- Fill a 1-quart sealable plastic bag (or pastry bag) with the egg whites.
- Seal the bag almost completely, leaving a small opening for air to escape from the top as you squeeze.
- Snip off one corner of the bag with scissors, making a ¾-inch-wide opening.
- Fold the top of the bag over a few times, then gently push the meringue down to the snipped corner. Working with the bag perpendicular to the baking sheet, pipe the meringue inside the 9-inch circle and the 7-inch circle, starting from the middle and working your way out to the edges, into a spiral.
- Use a spatula to smoothen up the surface of the meringue.
- Pipe the leftover meringue into 1 ½-inch-diameter cookies, spacing them about ½ inch apart.
- Bake at 212F/100C for 90 minutes. Shut off the oven and let the meringue dry overnight, preferably.
Dark Chocolate Mousse:
- Place a metal mixing bowl and metal whisk into the freezer for 10 to 15 minutes.
- Pour the heavy cream into the mixing bowl and whisk just until the cream reaches stiff peaks. Set aside.
- Mix water and sugar into a small pot and simmer it on the stove for a few minutes to make a syrup.
- Meanwhile, beat the eggs and the egg yolk together with an electric mixer until fluffy.
- Reduce speed to low, and pour hot syrup down the side of the bowl in a slow, steady stream. Increase speed to high, and beat until mixture cools down.
- Melt the chocolate using a double boiler. Remove from the stove and let cool for 2 minutes. Add it to the whipped cream made earlier.
- Whisk the mixture vigorously to blend the ingredients together.
- Add the beaten eggs and mix. Set aside.
Assemble the cake:
- Grab a 9-inch cake ring or a 9-inch springform and place the 9-inch meringue layer on the bottom.
- Pour over half of the chocolate mousse and spread it even with a spatula.
- Add the 7-inch meringue layer in the middle.
- Pour over the rest of the chocolate mousse. Make sure the surface of the cake is smooth. Use a spatula.
- Place the cake ring/springform in the freezer. Freeze for a few hours.
- When the cake is solidly frozen, remove it carefully from the cake ring/springform and glaze it.
Make the mirror glaze:
- Place sugar, unsweetened cocoa powder, heavy cream, and water in a medium pot. Bring to a boil and remove immediately. Allow it to cool to 104F/40C. This step is important, so please do not skip it.
- Meanwhile, hydrate the gelatin sheets for 4-5 minutes. Remove them from the water and squeeze the excess.
- Add them to the glaze and mix vigorously with a hand blender.
- Place the frozen cake over a metal rack that sits on a baking tray, to collect the excess.
- Pour the glaze over the cake starting from the middle and working your way towards the edges.
- Refrigerate the cake for at least half hour, so the glaze can set.
- Decorate with the little meringues and drizzle leftover glaze over them.
- Slice the cake and serve. Refrigerate the cake for up to 5 days.
Notes
- Oven Temperature: Use an oven thermometer to ensure your oven is at the correct temperature (212F/100C).
- Drawing Circles: Use a template or a compass to draw circles on the parchment paper.
- Overnight Drying: For the best texture, let the meringue layers dry overnight in the oven. This slow cooling process is key to getting crisp layers.
- Whipping Cream: Chill your bowl and whisk before whipping the cream to help achieve the perfect stiffness without overbeating.
- Chocolate Quality: For the mousse, use high-quality chocolate with 52% cocoa or higher. The quality of chocolate matters.
- Gelatin Preparation: If using gelatin sheets, make sure they're properly hydrated and squeezed of excess water to avoid lumps in your glaze.
- Serving Suggestion: Allow the cake to sit at room temperature for 10-15 minutes before slicing.
- Decoration: Get creative with decorations by adding edible gold leaf, chocolate shavings, or fresh berries for a pop of color and texture contrast.



Comments
No Comments