
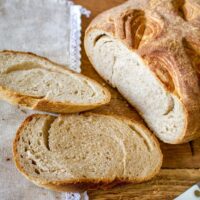
Whey Bread Recipe With Sprouted Spelt is a beautiful bread made with leftover whey from making cheese.
The crust is soft, the bread has a lot of flavor and keeps well for a few days. It is a delicious bread that is relatively easy to make, especially if you have a stand-up mixer. Enjoy!

Some time ago, I rediscovered this recipe of whey bread while I was making farmer cheese.
I had a lot of leftover whey from making Farmer's cheese at home and did not know what to do with it. I remembered a bread that is still made in Romania by the shepherds and cheese makers who use whey in different ways.
This is a beautiful, delicious bread with a soft crust that is quite easy to make, especially if you have a stand-up mixer.
You might find the recipe unusual, but in many countries, this bread is often made in villages or farms. The whey is packed with protein, adds flavor to the bread, and helps the dough rise.

There is no point in wasting the whey, right? Anyway, I bake bread at least once a week, and if you ask me why I do that instead of buying a loaf of bread from the store, my reasons are these:
Jump to:
Why You Should Make Your Own Bread At Home
1. Homemade bread is the best. I personally love the smell of a fresh loaf of bread and I totally dislike the regular bread from the store. I like to know what I put in that loaf of bread.
For sure, bread at home is not going to contain any artificial flavors, corn syrups, and other chemicals that you cannot read on the labels in the stores. Also, there is nothing better than fresh bread made in the comfort of your own kitchen.
I personally like to choose recipes that do not require a lot of kneading (see here my favorite recipe to make weekly bread), although I heard that there is something therapeutic about that.

2. Feelings of accomplishment- When you are holding a slice of warm bread in your hand, one that you made yourself, you'll know the feeling.
You will also get more energy from a slice of homemade bread than you can from any other kind of food. The bread you make at home can be packed with things that are good for you or things that are not so good when you want to take a break.
3. It might even help you lose weight if you are smart about it.

4. The bread you bake will be completely your own. It will reflect your personality, and nobody else's because of the multitude of variables you influence while working the dough.
Everything is important, from how generous or light your hand is when measuring ingredients, or how long you spend kneading the dough, the temperature in the kitchen, the size and the age of your oven, or even the relationship you have with it to the mood you're in at the time you bake.
All these factors will make the final product to be entirely your own.
5. Learning to make a simple bread will give you satisfaction that it is worth considering. Your first loaf may not be that beautiful, but baking every once in a while will make you succeed on more than one level.
Even if it doesn't look pretty, the smell and taste alone are enough to transport you. (Try this Basic American-Irish Soda Bread)
Did I convince you to make your own bread, or are you still thinking?
While you are still pondering if you want to try or not, you have to know that every respectable basic bread should have a maximum of 5 ingredients: flour, yeast, water(in our case, we will replace the water with whey), salt, and sugar.
You can basically make bread with only 3 ingredients, flour, water, and yeast. We add salt and sugar to this recipe because the salt gives flavor to the bread, and the sugar helps to "wake up " the dry yeast.
You can adjust either to suit your taste or diet.

Kneading the dough
Kneading the dough is not my favorite part, and I will tell you why. It is supposed to be the most pleasurable and satisfying part of the whole process, BUT ONLY if you are kneading on a surface that is at a comfortable height for you.
Traditional counter height, 36 inches, is fine for someone who is quite tall.
If you are short, like me, it is important to find a surface low enough so you can use your whole body when you're kneading, and not just your arms. Probably a 29 or 30 inches table might be better for you, or somewhere in between.
I don't have that, and by the time I finish kneading the dough, I have back pain. Therefore, this dough is kneaded in a stand-up mixer.
A note about the sprouted spelt flour
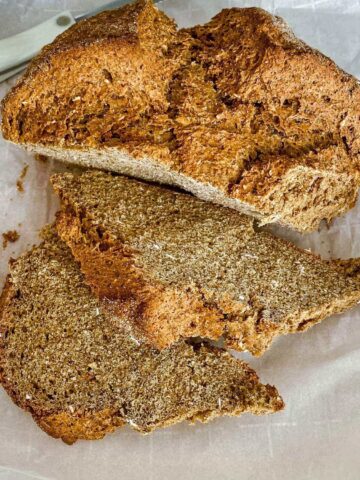
Sprouted spelt is an ancient grain that has less gluten in it. It is full of protein, minerals, and vitamins and is great for baking. Your bread will be darker in color and rich. The sprouted spelt flour is also easier to digest, which makes it an ideal flour for a healthier diet.
Overall, this bread is not only delicious but, between the whey and the spelt flour, also packed with protein, vitamins, and minerals.
Finally, here you have the recipe and the instructions to make this bread. I hope you will try it! You will definitely not be sorry! Enjoy!
More recipes to love
📖 Recipe
Whey Bread Recipe With Sprouted Spelt
Ingredients
- 4 ½ cups all purpose flour
- 4 ½ cups sprouted spelt flour
- 1 tablespoon salt
- 1 tablespoon sugar
- 1 tablespoon instant dry yeast
- 3 cups whey 110F/43C warm
- Oil for handling the dough on the table
Instructions
- Place the flour, salt, dry yeast and sugar in a stand-up mixer bowl.
- With the dough hook attached, start the mixer at a very low speed to mix the ingredients.
- Slowly pour the warm whey over the mixture, little by little, waiting for the flour to absorb the liquid.
- Increase the speed of the mixer to medium and knead the dough for about 10 minutes.
- The dough will be a little bit sticky, which is ok. Stop the mixer.
- Form the dough into a nice, round ball and place it in a greased bowl, turning it over so the top has a thin film of grease on it as well. This helps keep it soft so that, as the yeast grows and produces carbon dioxide bubbles, it can expand.
- Cover the bowl with a damp towel or plastic wrap. Grease the underside of the plastic so that it won't stick if the dough comes in contact with it.
- Let the dough rise for 1 to 2 hours, depending on warmth and humidity, or until it doubles in size.
- Preheat oven to 425F/220C.
- Place the dough on an oiled surface. If the dough is still sticky, use some oil on your hands.
- Cut the dough in half to shape it into two round loaves. Tuck the cut edge of each piece into the center of the dough so it is no longer exposed.
- Place the loaves on a baking sheet covered with parchment paper. Using a sharp knife, slice the surface of each loaf to create a pattern.
- Place the baking tray in the oven and bake the bread for about 55 minutes.
- When they come out of the oven, while still very hot, brush them with a little bit of water to give them a shine.
- Place the loaves of bread on a metal rack to cool. Do not cover them with kitchen towels. The bread needs to breathe and cool on its own.
- Only when the bread is completely cool should it be wrapped in a clean kitchen towel and placed on the counter.
- The bread can be frozen as well for later use.

Rune says
There are types of bread that dont need yeast.
Isnt that just to make sure it rises or something?
This recipe sounds really good though! I just discovered through one of your other articles I think that you can make ricotta cheese with lemon or vinegar, so I can use the leftover whey to make this bread afterwards.
Bread and cheese go together so well. ^^
The Bossy Kitchen says
This bread needs yeast, it is not a quick bread. Yes, you can use the leftover whey from the cheese to make this bread. This is what I usually do to use up the whey.
Mara Morey says
Buna, me again. I just made the cheese and it came out really good!
So I'm happy about that.
Intrebarea mea este daca "dry yeast" e la fel cu "active dry yeast"?
Si o alta intrebare, am gasit o reteta romaneasca care cere drojdie proaspata si nu am gasit in USA nicaieri. Stiti dumneavoastra ceva?
Multumesc!
The Bossy Kitchen says
You will probably not find fresh yeast anywhere. This is the difference between the two types of yeast: Active dry yeast has to be bloomed in warm water, while the instant one can be added to flour from the beginning. I would use whatever yeast you have available, as it doesn't really matter for the regular home baker.If the recipe calls for instant yeast but you have active yeast, use it, just make sure you allow the dough to rise 10-15 minutes more, as active yeast needs more time to rise. Viceversa, if you use instant yeast instead of active, reduce the time of rising a little bit. Imi pare bine ca ti-a placut reteta de branza de vaci, e buna si folositoare cand nu gasesti la magazin. 🙂
Gigi says
I made this bread today and the whole house smells amazing. The recipe was easy to follow and while I didn’t have a stand mixer to knead the bread, I was still able to make it and it came out so well!
Gabriela says
Hi Gigi, thank you for trying the recipe. I am so happy you liked it! this bread is indeed very good. Happy baking!
Rose says
Hey Gabriellai need we need to knaw how many grams is your 4/12 cups of flours? I personally am in Australia, cup sizes are all different dear. Please tell your ingredients by grams or, may be ounces? Thankyou so much for reading my message.
Gabriela says
Hi Rose, Under the ingredients, on the recipe card, you will find the metric system. Click on that button please and the entire list of ingredients will change. I hope it helps. Thank you for writing.